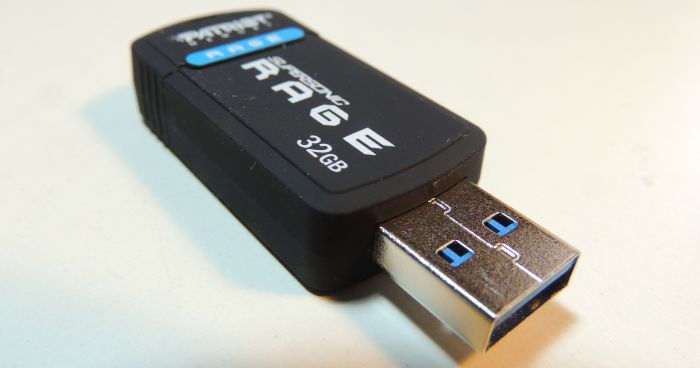
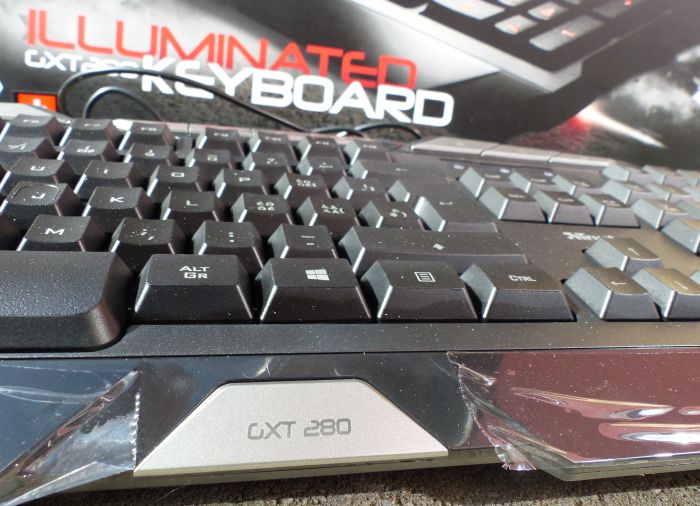
Je suis tombé dessus l’autre jour en passant à Interdiscount: un clavier gamer pas trop cher (45 CHF je crois) avec retro-éclairage.
Clavier pour Gamers: Trust GXT 280
News en vrac / WP sandbox
Je suis tombé dessus l’autre jour en passant à Interdiscount: un clavier gamer pas trop cher (45 CHF je crois) avec retro-éclairage.
Version testée: 1.02
GLC_Player est un viewer de fichier OBJ {Alias|Wavefront}, le format standard ascii de description des modèles 3D. Ce format est très simple dans sa structure et n’impose aucune contrainte quand à l’organisation des données. C’est finalement là que réside la grande difficulté à parser ce type de fichier. Je dois dire que GLC_Player remplit correctement son role de loader de fichiers OBJ.
GLC_Player propose une navigation de camera de type Virtual Trackball ce qui est très pratique pour manipuler l’objet et le regarder sous tous les angles. GLC_Player est livré avec quelques objets mais pour le lab infame il n’est pas question de prendre des objets qui sont tous certifiés GLC_Player loadable!
Je me suis donc rendu sur cette page et j’ai téléchargé le modèle de la Ferrari F40 Ce modèle est livré au format MAX. Ca tombe bien comme ça je peux le convertir en OBJ avec l’exporter OBJ de MAX.
Pour le test j’ai aussi utilisé HyperView3D afin de comparer les chargements.
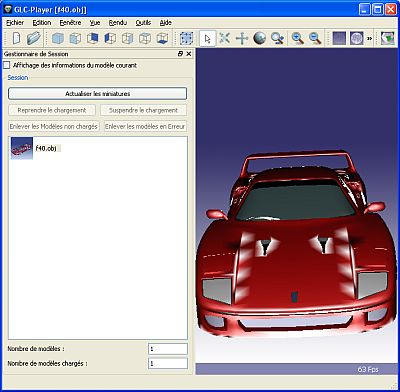
– Ferrari F40 et GLC_Player:
– Ferrari F40 et HyperView3D:
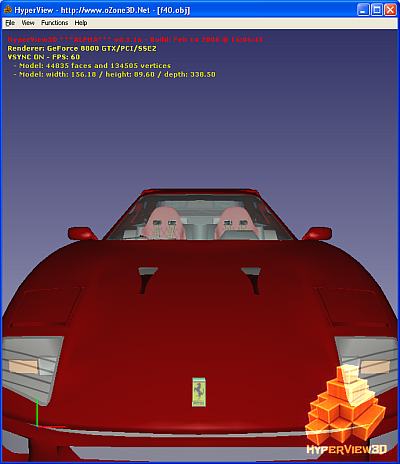
Les tâches blanches bizarres sur le capot viennent des normales exportées par MAX qui ne sont pas correctes à ces endroits. Ce petit détail mis à part, on voit que GLC_Player a eu un petit problème pour charger les textures (logo Ferrari sur le capot) et ne semble pas prendre en compte la transparence des matériaux (pare-brise et phares).
L’autre détail qui peut poser des problèmes pour une analyse plus fine des modèles 3D est la gestion des meshes. GLC_Player charge le fichier OBJ en un seul gros mesh alors que le modèle comporte 36 meshes distincts.
Conclusion: Pour rapidement visualiser des fichiers OBJ, je dirais que GLC_Player est parfait. Son coté multi-plateforme le rend disponible sous Windows et sous Linux. Il fait desormais partie de ma graphics toolbox à coté d’HyperView3D. Mais si vous avez besoin d’analyser un modèle 3D pour s’en servir dans une application 3d temps réel (Demoniak3D?) GLC_Player n’est pas pour le moment adapté.
Tested Version: 1.02
GLC_Player is an OBJ {Alias|Wavefront} object viewer. OBJ is the ascii standard file format to describe 3d objects. This format is very simple and do not force to follow a strict file structure. But this liberty has a price: the parsing is, in some case, quite difficult. And I must confess that GLC_Player does the job rather well.
GLC_Player offers a Virtual Trackball camera, which is very handy to handle the object and examine it under all possible angles. GLC_Player is delivered with some samples of OBJ files but for the infamous lab it’s out the question to use GLC_Player loadable certified objects!
So I jumped on that page and I downloaded the Ferrari F40 model. This model is provided in MAX format. This format is conveniant for my tests because I can convert it using MAX OB exporter.
For the test I also used HyperView3D in order to compare the way both tools load OBJ files.
– Ferrari F40 and GLC_Player:
– Ferrari F40 and HyperView3D:
The strange tasks in the hood come from the normals exported by MAX that are not correct at these places. Let’s forget this detail. We can see that GLC_Player has had a little problem to load some textures (the Ferrari logo on the hood) and does not take into account transparent materials (windshield and headlights).
The other thing that can prevent a detailed analyze of the 3d models is the way the meshes are managed. GLC_Player loads the OBJ file into a big and unique mesh even though the model has 36 distinct meshes.
Conclusion: if you need a tool to quickly view OBJ files, GLC_Player is that tool. What’s more GLC_Player is available for Windows and Linux. From now on, it lies in my graphics toolbox next to HyperView3D. But if you need a more accurate analysis of a 3d model in order to exploit it in a real time 3d application (Demoniak3D?) GLC_Player is not adapted yet.
La nouvelle version de GPU-Z est dispo. Alors faisons en vitesse le petit test de la température du GPU:
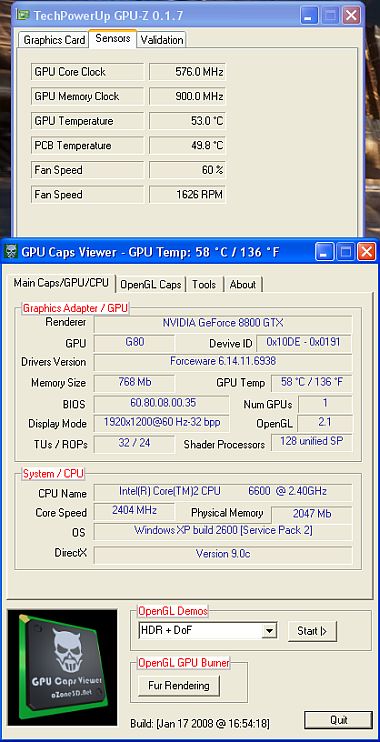
Bon, pour les GPUs GeForce, c’est pas mieux que la version 0.1.6…
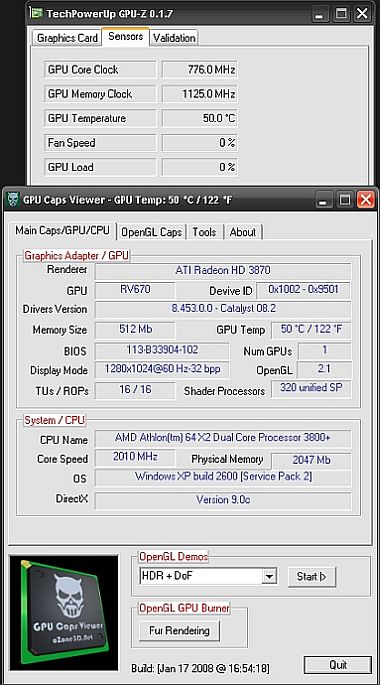
Par contre pour les GPU Radeon, la température est correcte:
Si vous êtes un mordu du clavier comme moi, alors voilà un utilitaire vraiment pratique pour améliorer votre productivité. KeyBreeze est une ligne de commande flottante qui permet de lancer presque tout et n’importe quoi. Une fois configuré, c’est vraiment un outil extrêmement précieux pour le geek que vous êtes.

Homepage: www.keybreeze.com
Voici la description officielle issue du site de l’auteur:
“Keybreeze is a command-line program launcher for Windows. Launch programs and websites by pressing a hotkey on your keyboard and typing keywords. You can search the internet, shut down your computer, access a dictionary, record macros, and access other shortcuts from your keyboard.”
Ca fait maintenant quelques jours que je m’en sers et je l’ai adopté. KeyBreeze se lance en appuyant sur une hotkey. Par défaut c’est le point-virgule [;]. J’ai choisi la hotkey suivante: [Ctrl]+[Backspace] que je trouve beaucoup plus pratique. En tant que développeur C/C++ je me vois assez mal appuyer à chaque fois deux fois sur le point virgule pour termminer une instruction.
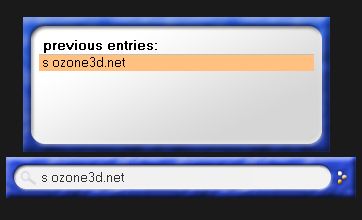
– Recherche sur Google d’oZone3D.Net: [Ctrl]+[Backspace] + s ozone3d.net + [ENTER]
– Lancement de la calculatrice de Windows: [Ctrl]+[Backspace] + cal + [ENTER] = environ 2 secondes…
– Lancement de la base de registre: [Ctrl]+[Backspace] + reg + [ENTER]
La FAQ vous propose un tableau avec la liste des keywords prédéfinis.
If you are a keyboard addict like me, then here is an utility really handy to boost your productivity. KeyBreeze is a floating command line that makes it possible to launch almost everything. Once configured, it’s a precious tool for the geek your are.
Homepage: www.keybreeze.com
Official description leeched from the author’s website:
“Keybreeze is a command-line program launcher for Windows. Launch programs and websites by pressing a hotkey on your keyboard and typing keywords. You can search the internet, shut down your computer, access a dictionary, record macros, and access other shortcuts from your keyboard.”
I use it for several days and I adopted it. You start KeyBreeze by pressing a hotkey. By default it’s the semi-colon [;]. I chose the following hotkey: [Ctrl]+[Backspace] which I find more practical. Being a C/C++ developer, it’s out of the question to press twice the semi-colon to finish an instruction.
Examples of use:
– Search for oZone3D.Net with google: [Ctrl]+[Backspace] + s ozone3d.net + [ENTER]

– Start Windows calculator: [Ctrl]+[Backspace] + cal + [ENTER] = about 2 seconds…
– Open Windows registry editor: [Ctrl]+[Backspace] + reg + [ENTER]
The FAQ presents you a more detailed table with all pre-built keywords.
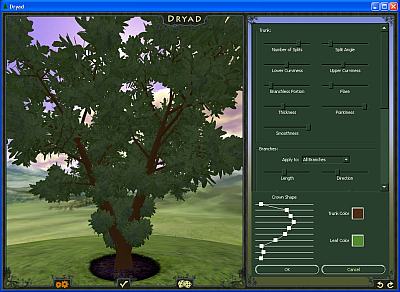
Une fois le type d’arbre sélectionné, un clique sur l’icone des engrenages qui affiche les paramètres de l’arbre. Il est possible de tout paramétrer: le tronc, les feuilles, les branches.
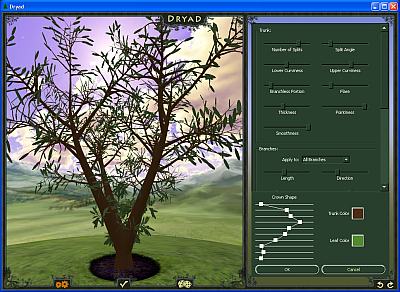
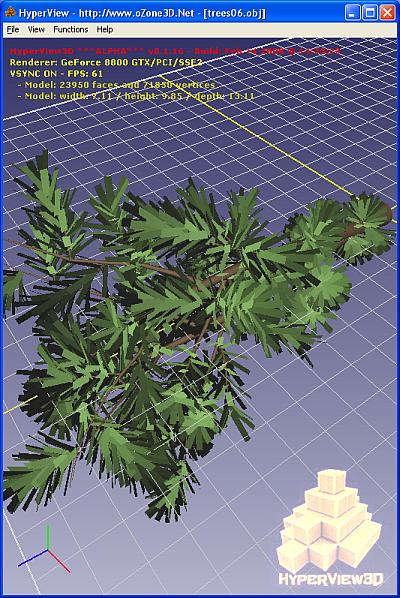
Sur l’image suivante, j’ai diminué le nombre de feuilles et légèrement incurvé les branches du haut.
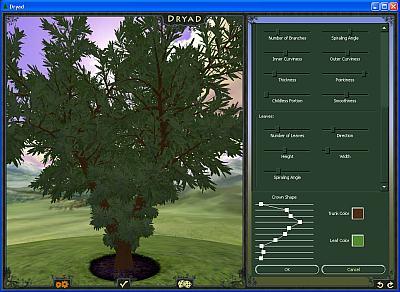
Mes réglages aboutissent à ce résultat final:
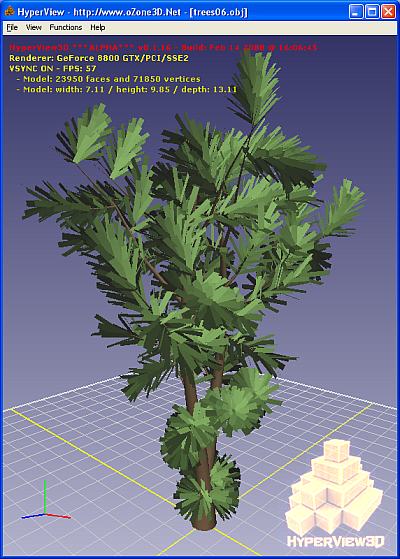
Dryad exporte votre création sous la forme d’un fichier OBJ. Celui de l’image précédente fait environ 62Mo, ouch! Le fichier OBJ est correctement généré et est accompagné de son fichier de materiaux. En modifiant à nouveau les paramètres, j’obtient un fichier OBJ de 2Mo qui contient environ 24000 faces. Ok chargeons-le maintenant dans HyperView3D:
Le problème est que les coordonnées z et y sont inversées. Mais HyperView3D possède une petite fonction pour remédier à ce problème: la permutation des coordonnées Y et Z des vertices. Vu que c’est un problème que l’on rencontre de temps en temps, cette petite fonctionnalité est utile.
Pour ceux qui veulent s’amuser avec ce modèle OBJ, le voilà: Dryad_Tree.zip.
Conclusion: Dryad est un petit utilitaire pratique pour la génération d’arbres mais nécessite une machine puissante. L’export en OBJ permet d’exploiter ses créations dans toutes les applications 3D qui prennent en charge ce format (comme Demoniak3D par exemple!).
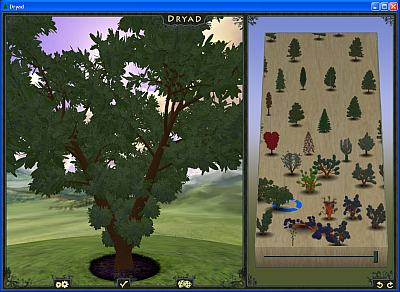
Dryad is a tree gnenrator. It’s an OpenGL application and is available for Windows and MacOS X. Dryad allows to select a tree from a space called “the space of all trees” (in the right side of the app). The tree is created by interpolation between all trees that lie near the mouse. Pay attention because Dryad is very memory-consuming and 2 Gb of ram is recommended.
Once you have select your tree, a click on the gearing icon displays the tree parameters. You can customize everything: trunk, leaves, branches.
On the following image, I reduced the number of leaves and slightly incurved the upper branches.
My adjustments end up to :
Dryad exports your creation in an OBJ file. The one of the previous image is a huge 62Mb OBJ file, ouch! The OBJ file is properly generated and comes with its materials file. 62Mb is too big, and after a few adjustments, I get a 2Mb OBJ file with approximately 24000 faces. Okay now let’s load it in HyperView3D:
Now the problem now is that Y and Z coordinates are reversed. But HyperView3D has a little function to solve this problem: the swap of Y and Z coordinates. Because we encouter this problem time to time, this little function is useful…
For those who want to play with that OBJ file, you can grab it here: Dryad_Tree.zip.
Conclusion: Dryad is a handy utility for trees generation but requires a powerful computer. The OBJ export makes it possible to exploit the trees in all 3D applications that can load this standard format (like Demoniak3D for instance!).
Daphne est un petit utilitaire de gestion de processus dans la même lignée que ProcessExplorer. Il affiche la liste détaillée de tous les processus avec toutes les infos (pid, path, threads, priority, …). L’option qui me plait dans ce tool est la possibilité de killer un processus de manière barbare, c’est à dire instantanément et non avec un temps d’attente de plusieurs secondes comme avec le task manager de Windows. Il est aussi possible de lister tous les threads appartenant à un processus et de les terminer individuellement. Très utile pour la mise au point d’applications multithreadées.

Une autre option disponible mais que je n’ai pas testée est de donner à Daphne le privilège “Debug programs”. Cela permettra à Daphne d’afficher encore plus d’informations sur les processus/threads du système. J’ai reproduit ci-dessous le contenu de la page Adding user rights on Windows XP:
In order to see full process list on Windows XP or over, you may
have to add "Debug programs" privilege to your user account.
   1. Run the "Local security setting" administrator by
      typing "secpol.msc" in the Run... option of yout start menu.
   2. Expand the tree by clicking the "Local policies" item.
   3. Select the "User Rights Assignment" item.
   4. Double-click the "Debug programs" option in the right panel.
   5. Click "Add user or group..." button.
   6. Insert the user name and click "Check names" button.
   7. Click the OK button and close all opened windows.
   8. You have to restart your session.
A new version of GPU-Z is out. That’s cool. W1zzard has added a new tab with some info (redundant at least for the two first) : gpu clock speed, temperature and fan speed. But I think there is a problem in the reading of the gpu temperature sensor. Here are the results with my 8800 GTX:
1 – GPU-Z: 52 °C

2 – GPU Caps Viewer: 58 °C

3 – RivaTuner: 58 °C
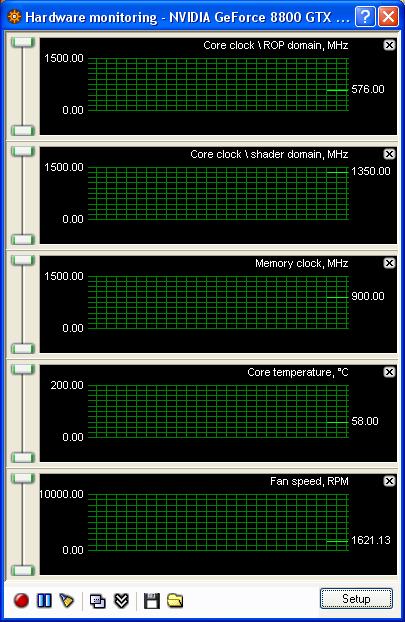
Ok let’s wait for the next version…
Je viens de m’amuser un peu avec Lumina. C’est un petit environnement de mise au point de shader GLSL. Le projet demarre et il y a encore pas mal de petites coquilles (essayez de charger plusieurs projets les uns à la suite des autres ou plus simplement chargez le projet de test deferred3.lum: l’interface graphique aime moyennement!) qui trainent mais le concept est bon. En regardant de plus prêt, cela ressemble fortement à une interface graphique posé sur un soft comme Demoniak3D. Il y a des scripts (écrits dans un language basé sur ECMA)pour mettre en place les éléments de la scene 3d et les controler. Il y a aussi les scripts GLSL (vertex, pixel et geometry). Si on analyse un fichier de projet on découvre une structure similaire à une démo Demoniak3D: un script XML, des nodes <script>, <shader>, etc.
Maintenant que le tour du proprio est fait, voilà mon premier projet de test ultra simple: afficher un torus jaune qui tourne le tout utilisant un vertex et un pixel shader pour le rendu. J’ai pu coder ce projet rapidement avec une analyse rapide des fichiers de projets *.lum.
Le projet est téléchargeable ici: lumina_jegx_test_01.zip
Globalement c’est sympa mais l’interêt de l’interface graphique est discutable. Dans ce type de soft (Lumina ou Demoniak3D) soit l’interface graphique est de haut niveau et simple à utiliser soit vaut mieux s’en passer. Je vais quand même étudier plus en détail le fonctionnement de Lumina ne serait-ce que pour améliorer Demoniak3D et son successeur…
Dans le même esprit que lumina il y a aussi FX Composer (NVIDIA) et RenderMonkey (ATI).
Several weeks ago, I posted on Beyond3D a thread on my dynamic branching benchmark. I wondered why dynamic branching performances on Geforce 7 were worse than ones on Geforce 6 or 8. I believe I’ve got the answer: Forceware drivers.
Here are some new results where ratio = Branching_ON / Branching_OFF :
7600GS – Fw 84.21 – Branching OFF: 496 o3Marks – Branching ON: 773 o3Marks – Ratio = 1.5
7600GS – Fw 91.31 – Branching OFF: 509 o3Marks – Branching ON: 850 o3Marks – Ratio = 1.6
7600GS – Fw 91.36 – Branching OFF: 508 o3Marks – Branching ON: 850 o3Marks – Ratio = 1.6
7600GS – Fw 91.37 – Branching OFF: 509 o3Marks – Branching ON: 850 o3Marks – Ratio = 1.6
7600GS – Fw 91.45 – Branching OFF: 509 o3Marks – Branching ON: 472 o3Marks – Ratio = 0.9
7600GS – Fw 91.47 – Branching OFF: 509 o3Marks – Branching ON: 472 o3Marks – Ratio = 0.9
7600GS – Fw 93.71 – Branching OFF: 508 o3Marks – Branching ON: 474 o3Marks – Ratio = 0.9
7600GS – Fw 97.92 – Branching OFF: 505 o3Marks – Branching ON: 478 o3Marks – Ratio = 0.9
7600GS – Fw 100.95 – Branching OFF: 508 o3Marks – Branching ON: 480 o3Marks – Ratio = 0.9
my conclusion is: dynamic branching in OpenGL works fine (read the performance are better than without dynamic branching: ratio > 1) for forceware < = 91.37. For the drivers >= 91.45, the ratio drops under 1. Dynamic branching works as expected for gf6 and gf8 but not for gf7 since forceware 91.45. So the bug explanation is a plausible answer (and it’s easily understandable: in this news we learnt that a forceware driver is made of around 20 millions of lines of code – a paradise for a small bug!!!). I’ve also done the test with the simple soft shadows demo provided with the NV SDK 9.5. The results are the same.
I’ve just done the bench with a 7950gx2 and the latest forceware 160.02 and dynamic branching is still buggy…
Voilà le nouveau ventirad pour le cpu que j’ai installé sur ma machine de test:

Je dois dire que j’en suis assez satisfait. Facile à installer, ce ventirad d’Asus est quasiment inaudible. Et il rempli à merveille sa fonction de dissipation car les aillettes restent froides en permanence. Evidemment, je pense que c’est mon AMD X2 3800+ qui ne chauffe pas assez mais par rapport au ventirad d’origine livré avec le cpu, la différence est nette.
Du bon matos :thumbup:
I must confess the SLI is a really cool technology. I assembled a SLI station based on the new nVidia Geforce 7600 GS series. This is a little graphic card compared to the high-end ones like the 7900GTX or the big monster 7950 GX2 (which in passing is really quiet in spite of its two GPUs and ventirads): the price of a 7600GS is about 100 euros, the price of a 7900GTX is about 400 euros and the cost of the 7950 GX2 climbs up to 500 euros! In terms of shader pipelines, the 7600 GS has 5 vertex pipes and 12 pixel pipes, the 7900 GTX has 8 vertex pipes / 24 pixel pipes and the GX2 has 48 pixel pipes and 16 vertex pipes. And so what? A 7600 GS SLI system offers almost the same level of gpu power than a 7800/7900 for a half price. I’ve verified this fact with the latest version of the soft shadows benchmark. With one 7600 GS (single GPU mode) the score is 510 o3Marks. With the two 7600 GS in SLI mode, the score jumps to 1004 o3Marks. The 7950 GX2’s score in single GPU is about 1200 o3Marks. Ok my bench is a small bench, you’re right. What about 3dmrk06? The 3DMark06 score is 4115 for the 7600 GS SLI system. This score is close to the ones got with a non-overclocked gf7800/7900.
Little remark: my 7600 GS are not overclocked.
Conlusion: for 200 euros you can have an excellent graphic system which is also silent thanks to the 7600GS passive cooler!