Normal-map, also called bump-map, is a texture in which each texel (texel = texture element) contains
a normal XYZ vector. In an usual texture, still called color-map, diffuse-map or base-map, each texel contains a RGB color.
Fundamentally, there is no difference between a normal-map and a color-map except the interpretation which is given to the texels.
The normal vector contained in a texel of a normal-map represents the vector perpendicular to the surface of an object on
the considered texel. In this quite particular case, the normal vector has the {0.0, 0.0, 1.0} triplet as XYZ components.
Such a vector indicates that there is no deformation (or relief) at the level of the pixel. In order to modify the surface,
using a different vector is sufficient, for example vector {0.2, 0.3, 0.93 }. An important detail for those which would
like to generate their own normal-map: a normal vector is always a unit length, i.e.
sqrt(X2 + Y2 + Z2) = 1.0 where sqrt() is the square root function.
The main use of a normal-map is the (per pixel) description of an object's surface. This very accurate description, as it is made at a
pixel level, is used in the bump mapping and per pixel lighting algorithms. The built-in lighting algorithms of the graphics controllers
use the per vertex normal, which leads from far to a non-realistic lighting, unless the number of polygons becomes very
large (but in this case we will have some rendering speed problems!). Thanks to the programmable shaders (vertex and pixel
shaders), one can from now on achieve lighting calculations at the pixel level by exploiting the normal-maps which leads to
get a very realistic rendering without having high polygons models.
Generally, a normal-map comes from a color-map. This is done with normal-maps generators.
Let us see all that in detail.
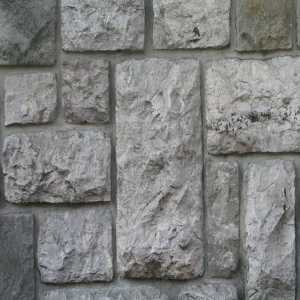
First, here is a color-map:

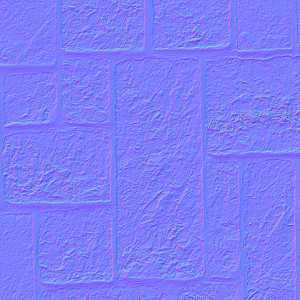
fig.1 - The color-map.And here is the normal-map generated from the color-map:

fig.2 - The normal-map.The tool that I've used to create the normal-map was available at a time on the nVidia website. May be it is still there
but in a hidden directory. To save time, you may download it at the end of this page. This tool, nmapgen.exe, is a small software that works
only in command line (I love this type of tools!). I also include the bat file that goes with it and that makes it possible to directly
generate the normal-map with a simple double click. The XpConfigurator tool enables you to
install the opening of a Dos Shell with a mouse right click within Explorer. This is very convenient to generate anywhere a normal-map.
The Photoshop plugins provided by nVidia to create a normal-map may be downloaded from the following page: Adobe Photoshop Plug-ins.
A normal-map may be recognized by its bluish color. I told you that each texel contains a XYZ vector. If one tries to directly visualize
a normal-map with a simple image viewer, each texel will be interpreted as a RGB color. That means that the X coordinate of the normal
vector will be read as the R (red) component of the color, Y will be read as the G (green) component and finally the Z coordinate will be
comparable with the B (blue) component. As the normal-map representing the surface of the object is expressed in tangent space (for
explanations, please refer to this tutor: Bump Mapping with GLSL), most
of the normal vectors will have a Z coordinate much greater than both the X and Y coordinates. Z being interpreted as the blue component of
the color, the normal-map will be overall bluish.
The use of normal-maps in bump-mapping is explained in this tutorial: Bump Mapping with GLSL.