At Demoniak3D’s level, Novodex’s engine ismainly accessible through LUA scripting (HYP_Nx_Physics library) and
through elements and attributes in XML’s scene description. In Demoniak3D version 1.0.0, only a small amount of
Novodex’s functionalities have been implemented. Those functionalities gather force management, couple, collisions, all
this management is applicable only to simple objects such as : sphere, box and plan. But with those primitives, we still
can do several things!
***IMPORTANT in order to properly execute Ageia PhysX demos***: Ageia PhysX Drivers and Demoniak3D
Now we reach the funiest part of this tutor. But first, a screenshot:
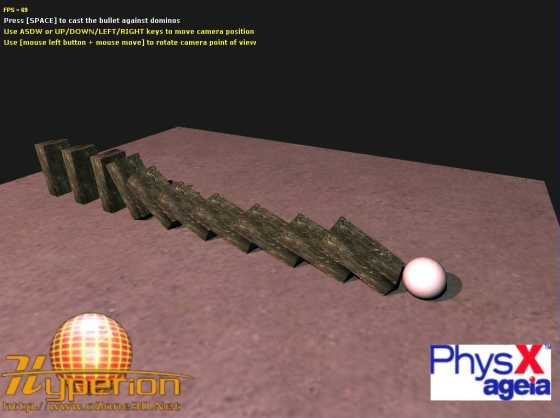
fig.1 - Dominos fall.The demo purpose is very simple: a few dominos (or something looking like) are set on a plane and pressing the space
bar triggers a ball throw at the first domino on the right. The rest is logical: the fall of the first domino triggers the
others’. The source code is available at the bottom of this page.
The first thing to do when we want to use physics is to initialise the engine at Demoniak3D’s scene’s level.
This is done simply by setting
nx_physics_simulation and
nx_collision_detection to TRUE as shown in the
following code:
<scene name="NX_Scene"
	nx_physics_simulation="TRUE" nx_collision_detection="TRUE" >

	<nx_gravity x="0.0" y="-100.0" z="0.0" />
</scene>
nx_physics_simulation attribute allows to start the engine. Little detail but which has is importance: Novodex’s
engine manages its own scene tree, as well as oZone3D manages its own. In oZone’s one, the tree’s nodes are called objects, in
Novodex’s they are called actors. From there came the naming of some libraries and LUA’s host API’s functions: HYP_Object,
HYP_Nx_Physics.SetActorLinearVelocity() for example.
The
nx_collision_detection activates the collision management. Most of the time it will be activated.
nx_gravity element allows to set the gravity value for the whole scene. The default value is {0.0, -9.81, 0.0} but the
simulation gets more realistic when multiplying this value by 10. I suppose there’s a bug somewhere in Demoniak3D but I couldn’t
located it, I’ll get it sooner or later!
Once the physics engine initialised, it remains only to set all the 3D objects/actors in the scene. In order to add one
actor to the physical engine’s scene, all we have to do is to use
nx_add_to_physics_engine available in primitives,
mesh or model nodes. The following code sample shows the model node usage:
<model name="box08" filename="data/domino/box01.3ds"
	lighting="TRUE" texturing="TRUE"
	nx_add_to_physics_engine="TRUE" shadow_caster="TRUE" >

		<position x="-140.0" y="20.0" z="0.0" />
		<orientation yaw="90.0" />
	</model>
In order to make the dimensions well interpreted by the physics engine, it is essential to center the model in the
modelling software. That means that if in Demoniak3D the object’location is {0.0, 0.0, 0.0}, its bounding box must be centered
on {0.0, 0.0, 0.0}. To display the bounding box, use the
display_bouning_box attribute in mesh or model node.
The initialisation of the ten dominos and ball is done in a similar way. Details are shown in the related project.
This demo shows us a glimpse of the
HYP_Nx_Physics library of LUA’s host API.
When pressing space bar triggers the ball throw. But how is this ball thrown? Simply by affecting a velocity vector to
the ball using
HYP_Nx_Physics.SetActorLinearVelocity() function. To prevent the ball from going to far, we can add
to it a speed damping factor using
HYP_Nx_Physics.SetActorLinearDamping() function.
Finally, to increase the realism, a small rotation with damping is applied to the ball through
HYP_Nx_Physics.SetActorAngularVelocity()
and
HYP_Nx_Physics.SetActorAngularDamping() functions.
<script name="start_sim_lua" run_mode="ASYNCHRONOUS" >
<raw_data><![CDATA[

HYP_Nx_Physics.SetActorLinearVelocity( "bullet",-200.0,100.0,0.0 );
HYP_Nx_Physics.SetActorLinearDamping( "bullet",2.0 );

HYP_Nx_Physics.SetActorAngularVelocity( "bullet",0.0,0.0,1.0 );
HYP_Nx_Physics.SetActorAngularDamping( "bullet",1.0 );

]]></raw_data>
</script>
I think that the essential have been told, for this introduction to the use of NovodeX’s physics engine. We will soon have
the occasion to talk about it in future tutorials.